For anyone who love to cook, and I use a lot of spices – from sweet Hungarian paprika to spicy Jamaican jerk seasoning. Also in the other hand, loves to bake – so on any given day, we have all the ingredients to make anything from chocolate chip bundt cake to spicy Bahamian chicken.
Unfortunately, with such a large spice and baking collection, it was getting very difficult to find something when we needed it.
We were storing all the spices in a corner cabinet, and they took up the entire cabinet. We tried everything for organization – a spinning rack, a mini spice organizer – nothing seemed to save us space or time.
How to Build a Sliding Spice Rack in your Kitchen
When making a meal, I would have to dig through everything to find what I needed. And Eileen wasn’t happy when she was looking for cinnamon or baking powder, and it was shoved behind the seven spices I used the night before for taco seasoning.
Planning The Spice Rack
Shortly thereafter, we were having dinner at a friend’s house and saw their spice solution.
They were utilizing a 6-inch gap between their fridge and the wall to fit a movable spice shelf, mounted on wheels.
I thought it was such a brilliant idea. I googled the idea later that night and saw it was a very popular spice storage solution.
There were lots of incarnations on Pinterest. I was set on incorporating a similar design into my kitchen, but I wanted to take it up a notch.
I didn’t like the wheeled shelf design. It would limit you to one massive shelf. Also, without some type of track system, I thought the shelf would be wobbly.

After some thought, I settled on 2 independent spice shelves mounted to the wall on drawer slides.
Aside from the drawer slides, I had enough scrap wood in the garage to build my design.
I didn’t really plan this project out much (aside from basic measurements of available space), mostly winging it as I went along. Nonetheless, the sliding spice rack turned out well.
How To Build A Sliding Spice Rack
I started off building one of the shelves. First, I fabricated a box with ¾” thick boards and nailed a hardboard composite backing. I then made some compartments for organization.
I averaged the sizes of my spice jars to determine a good depth and height for the shelves.
Here’s an early picture of the shelf unit:
How to Build a Space-Saving Spice Rack
Determined to re-use scraps from the garage, I attached some wood trim to serve as fences to prevent the spices from falling out.

Also, I couldn’t just attach the drawer slides to back of the shelf structure in the picture above.
I had limited space between the wall and the fridge, and fitting the spices with a drawer slide behind exceeded my available width.
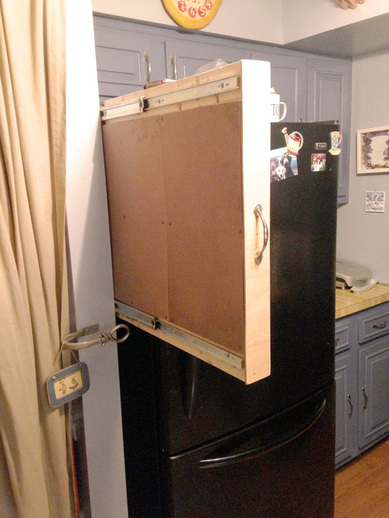
So my solution was to mount the drawer slides above and below the shelf, being almost flush with the shelf backing.
I attached a piece of 2×4 to the top and bottom of the shelf to serve as a mount for the slide.
I then attached some plywood to the front of the shelf and screwed on a handle.
Then I mounted the two drawer slides to the wall, and attached the shelf. The slides were attached directly to wall studs.
I also had to make sure that both slides were equally level. Any discrepancies in the slide angles would most likely result in a jamming drawer.
Here is a close-up picture of the mounted shelf with some spices in it (notice the repurposed wood trim):

I built the second shelf much like the first. However, I increased the height to make the most of the available space.
After mounting this shelf, I painted the front-facing plywood, blending in to match the color of the kitchen (see pictures below of the completed spice rack).
Using The DIY Spice Rack
The sliding spice rack turned out great. We adapted the top shelf for our most frequently used spices, while the lesser-used ones ended up on the bottom shelf.
Whenever we needed a spice, I just pulled out the appropriate drawer and located it instantly – very different from before!
I should mention too that the corner cabinet that previously held all of our spices was now completely empty, giving us more space for all those pesky tupperware containers.
Anyone have a good storage solution for those?!
Time & Cost
Building the spice rack took about one weekend, and the total cost was less than $50 because of all the scrap wood I used (my estimate is about $70 if you are buying all the wood from the store).
The spice rack became the hit of many parties.
Our friends were always asking about those mysterious handles next to the fridge, and were amazed when the handles revealed a plethora of spices.
Our next door neighbors noticed the spice rack when we were moving out of the house and were fascinated with it, saying, “Forget all those updates you did, this is what sold the house!”
(As an aside, we replaced that dingy pantry curtain with French doors before we moved, check it out here).
If you are looking for a solution to your spices, building a sliding spice rack could be the answer 🙂